I like this. This is cool

Rei
Rei got a very complex project. She cannot speak very good english so explaining is something very hard for her to do. However......


Sam Johnston
Sam ask me to look at his idea of a navigation clock that always point to where your home is.


“It creates this, kind of, branching thoughts which, especially when you are trying to analyse the function of the object. I thinks that helps”
“it allows you to attribute what is happening with the user as well as what is happening to the object at each experience and interaction. That is where its comes in. Rather than looking at the overall interaction, you analyse each specific interaction the user have with the object.”
“May be that’s what coding is more like, I don’t have a lot of experience. May be that in coding you got to analyse each interaction really closely so you understand all the possible outcomes”
“I think it given me an understanding, not only how the object works with interaction, but how it would fit into a larger scheme. Before, I haven’t even consider how to get this object to set location, even if I might not end up coding it, its help me figure out how its feed into the system, like a system blueprint where I can analyse each interaction the object is having with itself as suppose to the user and how that’s feed into the rest of it”
“It makes you not just say “oh yeah the light lights up when this happens”. It says if the button is pushed then what are the circumstances, what does that makes it do and how does it comes out as an output. It has the input, choices, output”
“In GSA, there are a lot of focus with the user,testing and getting their feedback. This moves away from it but probably in a good way where you are taking elements that are important to the user but closely analyse the interaction or the product from the product point of view as oppose to the user point of view”
“It definitely provokes different kinds of thought about an object. Before, I was considering the journey and how the user uses the objects. But this, even if you are not using it for coding, it makes you more closely analyse the function of the object and how they feed into one another.”
Early explanation of ideas


Screen
Screen to print
Screen sketching
One of the problem that I found was the implementing storyboard made it so much more complex as you won't be dealing with a story that involve time, you will be dealing with 'freedom of story'. I am talking about the storyboard that contained more than one concept, sense/output things different things at different time and also long-winded storyboard.
I tried to simulate how the whole thing could link together. So it would give the user a clear overview of how the whole thing works together
Its funny how all the lines just flying around and stuff
Messy?
So the problem with that is .... IT IS MESSY! and it is very hard to see clearly how the whole things works. So I thought about would could actually be done to help this
One of the way to solve this is to put the emphasis on the concept and make the concept to become the 'core' of the software.
I think the software should be focusing on the interaction of the designer's concepts and making the interactions comes to life through the tools that I am going to build. In addition, the software should also serves as a documentation tool that allows designer to put in a storyboard to give it a more context to their object.
Basically, it should 1. Break down your idea 2. Allow you to prototype your interaction of each concept using my tools. 3. Allow you to document your idea systematically.
The 'concept' will be the core object of this program. A user need to create a concept first before assigning any interaction or Rule of interactions otherwise it will prompt the user to create a 'concept' first. This goes the same way with storyboard. The user can start with storyboard to give the guideline but in order to do progress forward (i.e. create interaction), they will need to create a concept.
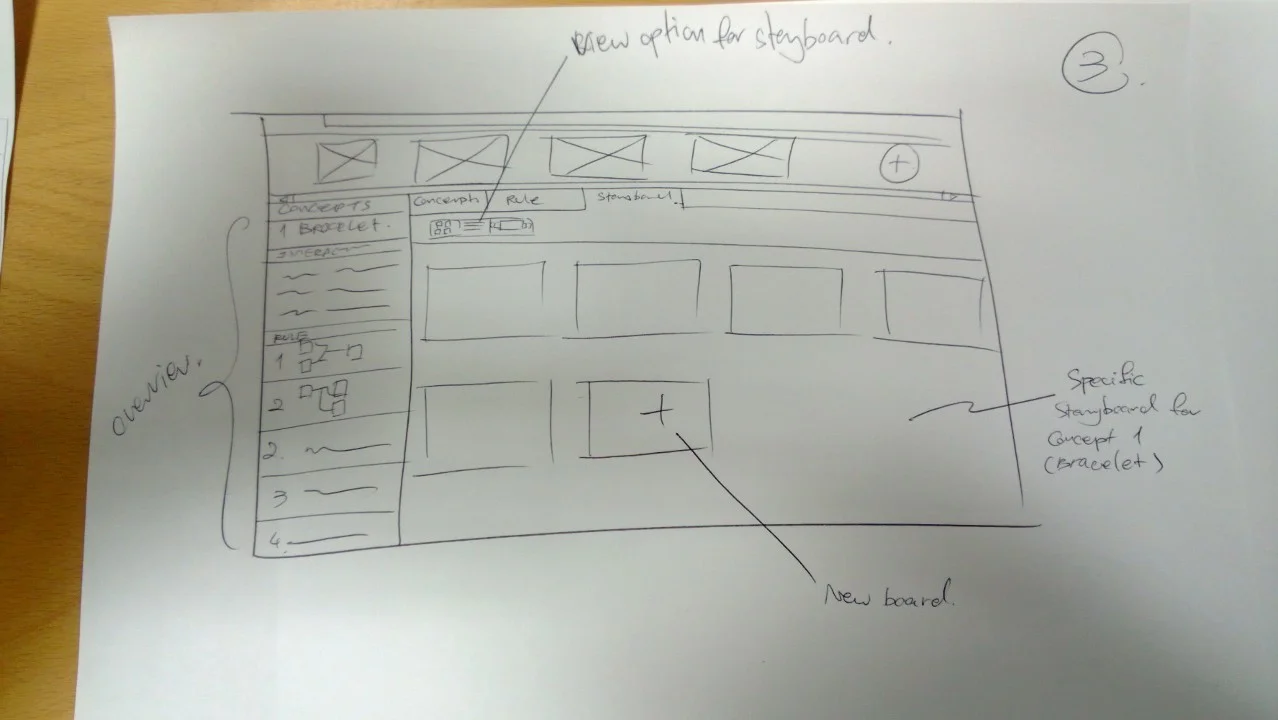
The program will contain 3 key sections which are Concepts, Interactions and Storyboards.
Let's say the users created a new project. They will be faced with these key structures
Concepts - The concept is the core of the software. User can assign interaction to the concept as well as tag it in the storyboard. There can be more than one concepts in one project (This spec came from some of the potential user like Stephen where he wanted to make bunch of different concepts in one project.)
Interactions - This is about defining the rule of how each of the concept. However, user will need to create a concept before assigning any interaction. This is to prevent interaction that just 'floating' around - this part will be linked with the wireless sensors and outputs that I am building.
The Storyboard will be more of a guideline, It will also allows the user to tag where the each of the concept is use in any particular frames. This should give more context for the user to actually understand how their thing is going to actually work together. It is not compulsory for the user to use the storyboard in their project but it is always available for them to use
So here is some thing I thought of (right now)


Here are the picture of all the sketches


Turning it to the screen
Well, my part of the physical tool is done. (for now) I am focusing my attention to building a virtual tool that will connect what is forming in the physical world (well, its the rules that were created) to the virtual world so that the computer could then assign the right condition to the right sensor and the right output to the real output.


Stuart came in and suggested to me that I should also try to link what I am doing to the computer version. First, I didn't think it would make any sense since I was thinking that it will make it more complicated. However, after some thought I think it make a lot of sense. The physical tools that I am doing is a very structured way of documenting the concept that was created during the design process. If I can combine storyboarding then I am proposing a new and structured way to record the concept by combining storyboard, interactions and rules of interaction together to present a concept.
Slaa Hwang - Concepts for Cats!
Ok, so Slaa (PD4) showed me some of her concept and we ran through it together.
“At first it was a bit confusing. I didn’t get the concept of what is the input and output. After I did the first one with you it makes much more sense and now my concepts make much more sense”
“I never really had a method and it always go off in a tangent. I didn’t really have a chance to think about it logically, step by step”
“After this I know what I should make and what I need to research to make it happens”
“It is more structure where as in my notebook it is like ... “Oh what if this happens?” and there is no conclusion to it. I wouldn’t be going anywhere. Your method got me to think about my actual concept a bit more rather than what could it be ... these, sort of vague thought.”
“I have been doing a bit of storyboarding in my notes but that never makes the concept anymore precise. It never pins anything down. I used to focus more on the emotional things rather than the actual concept. The things around the concept on storyboard rather than what this is”
Nicola Dunlop. Interactive CD and Platform
Nicola got some ideas. Two ideas in fact.
- The CD rack that once you pick up a CD it will show the CDs are in the same music type or gerne
- A panel and a tablet that react when they touch each other. Once they got touch, the tablet will be showing different information about that particular bands + bands blog, youtube, twitter etc...
What I have learn with Nicola is that the tool that I am using can go very well with storyboard of a journey or in user journey. The problem with storyboarding is that the designer who uses it never able to get into a precise and fine detail of how its is going to be interact. Storyboarding helps you to look at the flows of interaction with different user and the context but it won't be looking specifically at how it will actually works, what are the underlying rules of interaction of that product and how the product sense the change in contexts and my tool is built specifically for that.
Here is Nicky figuring out what's inside her stuff
One of the things that I noted is the fact that in storyboarding, we have so much freedom on what to do, what do draw and thus this makes most of the design to lose focus on what they wanted to actually talked about. I not saying that freedom is bad but I am saying that when you have too much freedom, you tend to lose focus and you tends to make it less specific.
Another point is that you can never actually compared two storyboards properly since there are so much degree of freedom that you could do and there might not be a thing that is interchangeable or digestible. For example, imagine comparing a storyboard that consisted of 50 frames and another with 10 frames.
Designers are not master storyboarders nor screenwriters but we could implement it with other tools to make it more clear
Here is Nicky commenting on my tool and user journey
“To pull an aspect of the user journey into here. It makes you homing on it instead of seeing it as part of one continuous thing and it makes you focus on one idea and how it could actually work”
“I think you don’t tend to pull out a physical interaction and work on it, you seeing it as part of one whole journey which is alright for saying what you want. But in term of working through the nitty gritty then working in full user journey won’t give you that”
How it might looks!
So, im just playing around with the form of the sensors and the output.
I am trying to learn a bit more about the form and how it could be used effectively. so I tried to use different shape to indicates the input and output. (input as square and output as circle) Here is how they look. I am still playing around with the size and the height so some objects are in different size and height


Spec and Idea
So, I have a thought about what my concept could be from all the concept.
I built up specific rules so that it goes well together. Here are the rules (More like specification in design term)
Specs
1. The design must built on top of the D&F toolkit
2. The design should allow people to ‘connect’ input and output intuitively
3. One input should be able to use with many output
4. If possible, it should allows a combination of two or more condition to trigger an events
5. the sensors and output should be able to place in different
places that might be far apart from each other
6. The programming should use the format of IFTTT
(If this then that)
So, from that I have made some ideas up


After the evaluation with me and myself, I think that the one that make the most sense is the one that is wireless and use each of the sensor as a modular piece. The reason is that
- Having it wireless will allow these sensor and output to be placed anywhere and so it allows more flexibility of how the product can be used.
- Having every sensor as modular will not only contributed to the first part, it will also allows the the user to understand how each of the sensor behaves individually and it has better link with the Defining and structuring tool since the condition cards were made as an individual pieces. Thus created a direct connection between the two tools.
Maria Townsley
Maria wanted to make connected perfume bracelets that when someone touch or rubbed the bracelet so that its warmer than 38C. It will then tell another bracelet to release the perfume on the other side.


Some comment from Maria
“I understands what the input and the output are. This let me know what .... its a lot clearer in my head.”
“its nice in boxes. I can tell the way this is laid out so you got the outputs and the conditions to get to your output. This is how I would prefer to learn. Having it right in my face”
Josh Menjamin McDonald
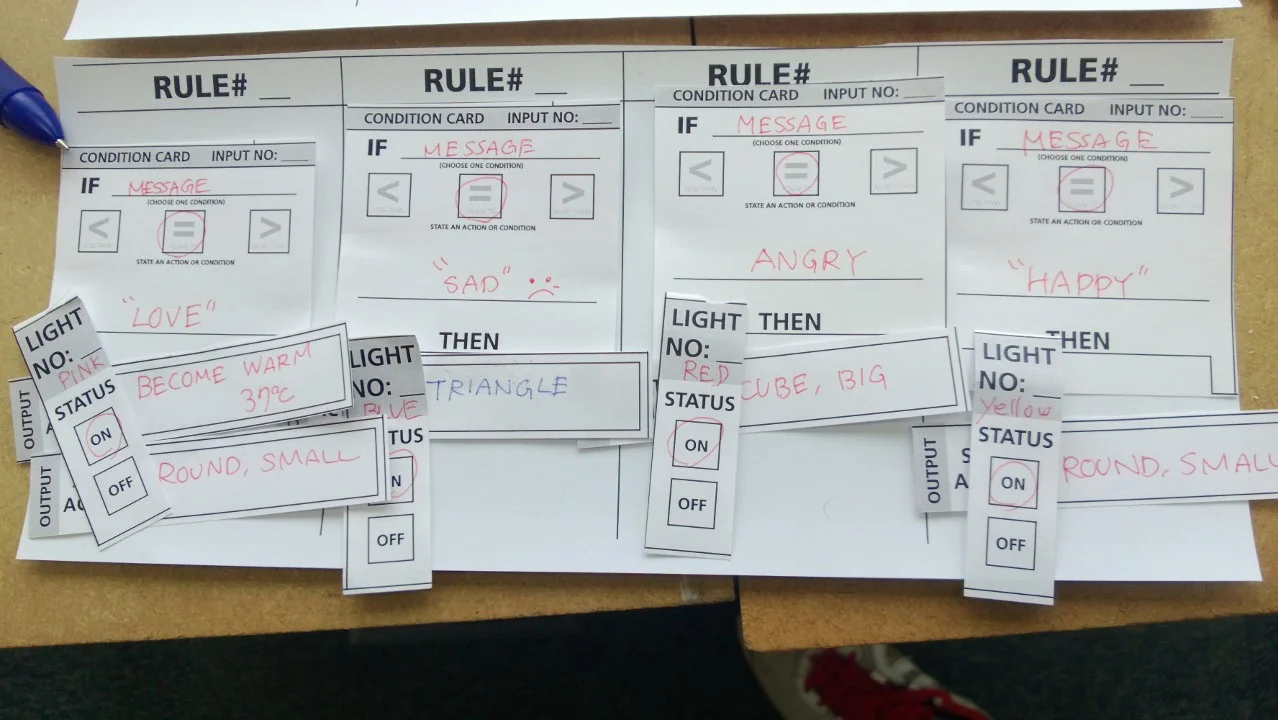
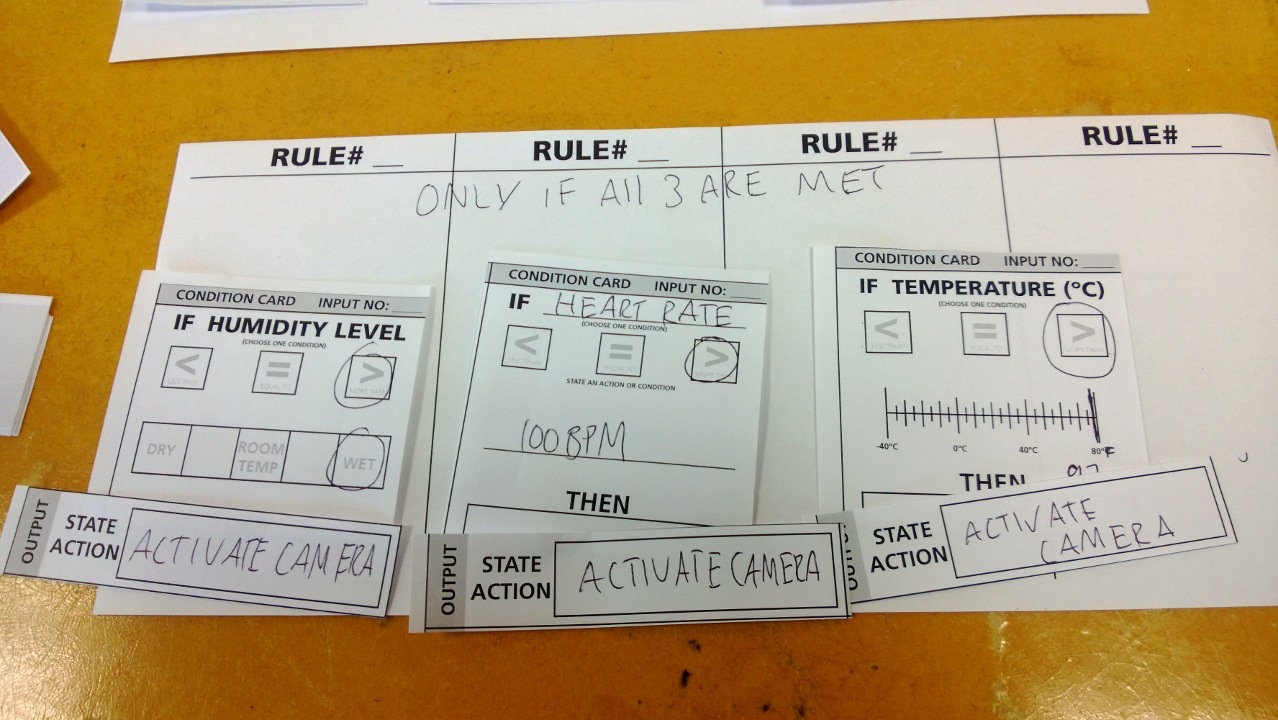
Josh got an idea of making a device that takes a photo whenever a heart rate, temperature and humidity reach a certain level


Making of Video
Josh talking about my tools and GSA tools
Josh expanding his first idea into several versions
“Its a lot easier to visualize and It was a lot harder to put it down on paper”
“instead of trying to figure out how it will work (on paper) where as I can just see one rule is using temperature increase then activates the camera”
“I never thought about the idea of using rules. I know that in Arduino its like if such and such happens then such and such happens”


Maya McBeetie
Maya approach me with the concept of interactive bus stop. She show me the video. Basically it plays music when the user enter the bus shelter. If the user sit on the seat then it slow down the music. If the user touches the panel then it will plays a note. if the user leave the area then the music stop
From that, I helped her laid out all the interaction.


Here are some feedback of using this system
“I actually understand what I want the program to do”
“Its structure what the different things have to do.”
“knowing how the thing will work by having something in that distance its makes me understand how the program works but also I understand what I want the things to do.”
“Its make everything more structure and clearer”
Second : Harshada Patil
Basically a bottle that record when you speak through and play your sound when you open.


It seem that this might be a bit complicated if it only uses with arduino. So, I purpose the use of processing and arduino in combination.
Here is the picture of arduino
Left button is for recording and finish recording
Middle is for save
Right is for play the recorded message
Basically she could put a microphone at the bottom of the bottle and uses the wizard of oz technique to illustrate the experience (basically controlling it from behind)
So when the user start speaking, she press the left button. Once the user finish speaking she press the left button again to finish the recording then press the middle button to save.
Once someone pick the object up are unscrew the cap. She then press the right button the play the sound.
Arduino code
int recordButton = 0;
int saveButton = 0;
int playButton = 0;


void setup(){

   Serial.begin(9600);
}

void loop(){
   recordButton = digitalRead(10);
   saveButton = digitalRead(3);
   playButton = digitalRead(7);

   if(recordButton == HIGH){
       Serial.print(1);
       delay(200);
   }
   if(saveButton == HIGH){
       Serial.print(2);
       delay(500);
   }
   if(playButton == HIGH){
       Serial.print(3);
       delay(200);
   }


}
Processing code
import ddf.minim.*;


int beenrun = 0; // 0 = never run 1 = already run
Minim minim;
AudioInput in;
AudioRecorder recorder;
AudioPlayer player;

/*##########################*/
int countname; //change the name
int name = 000000; //set the number in key's' function
import processing.serial.*;    //  Load serial library

Serial myPort;        //  Set arduinoPort as serial connection
// change the file name

void newFile()
{
 countname =( name + 1);
 recorder = minim.createRecorder(in, "confession.wav", true);
 // println("file/" + countname + ".wav");
}


void setup() {
 size(512, 200, P2D);
 textMode(SCREEN);
 myPort = new Serial(this, Serial.list()[6], 9600);    // Set arduino to 9600 baud
 minim = new Minim(this);
 println(Serial.list());
 // get a stereo line-in: sample buffer length of 2048
 // default sample rate is 44100, default bit depth is 16
 in = minim.getLineIn(Minim.STEREO, 2048);
 // create a recorder that  will record from the input to the filename specified, using buffered recording
 // buffered recording means that all captured audio will be written into a sample buffer
 // then when save() is called, the contents of the buffer will actually be written to a file
 // the file will be located in the sketch's root folder.

 newFile();//go to change file name
 textFont(createFont("SanSerif", 12));
}

void draw() {
  background(200);
  if ( recorder.isRecording() )
 {
   text("Currently recording...", 5, 15);
 }
 else
 {
   text("Not recording.", 5, 15);
 }
 int inByte = -1;

  while (myPort.available () > 0) {
    inByte = myPort.read();
    if (inByte == 49){

      if ( recorder.isRecording() )
             {
               recorder.endRecord();
             }
             else
             {
               /*#######################################*/
               newFile();
               /*#######################################*/
               recorder.beginRecord();
             }
    }
    if (inByte == 50){
                 recorder.save();
             println("Done saving.");

             println(name);//check the name
       }
       if (inByte == 51){
             player = minim.loadFile("confession.wav", 2048);
             println("Done saving.");
            player.play();
       }
  }
}
void stop()
{
 // always close Minim audio classes when you are done with them
 in.close();
 minim.stop();

 super.stop();
}
First user test : Yasmine Li
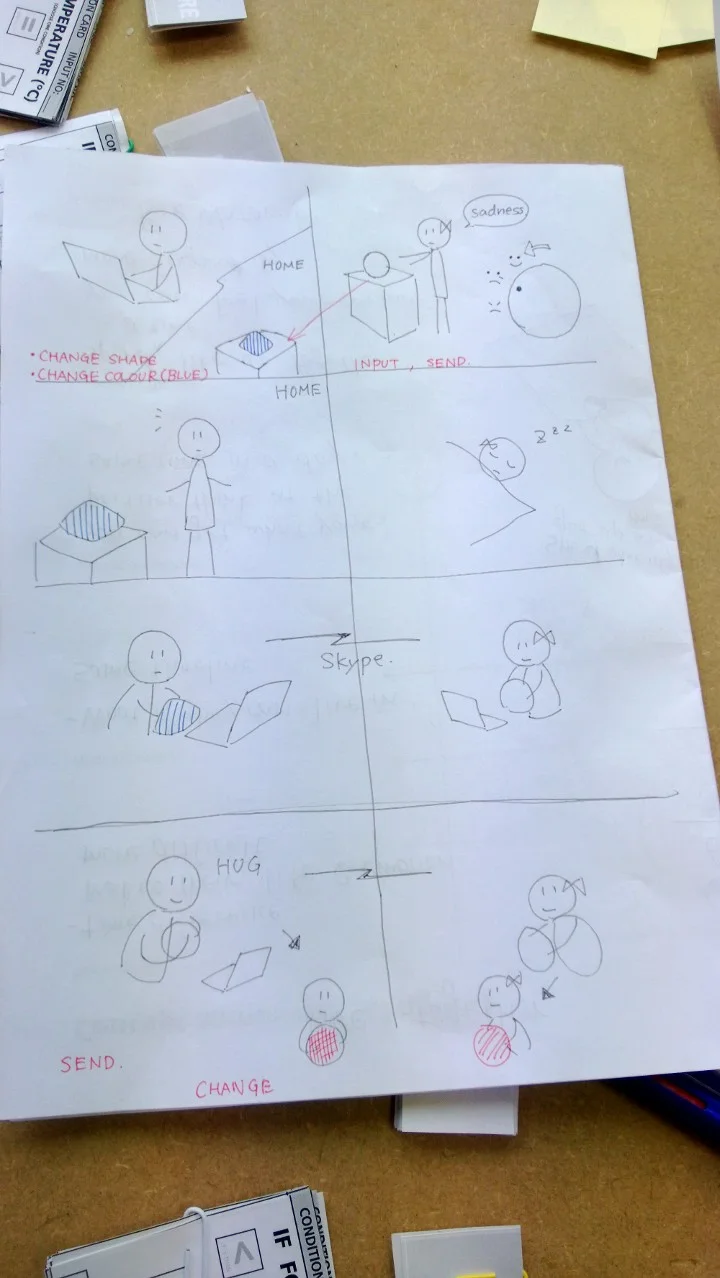
So, Yasmine Li approached me with her sketch idea. Basically it is a device that communicate moods to people. Let's say if someone is making too much noise then the user of this machine can send a email stating condition like "Red - Shut up, Yellow - It's getting to loud be quite, Blue - please watch your noise level, Green - Everything is fine."
So I asked her to state these into the tool v3. here is how it looked


I made the thing for here - didn't take too long. Only 30 mins ( the hard part was the wiring - cutting wires was a bit annoying, programming took me 2 mins)
Here is some video of her explaining her stuff after she got the working prototype
Yasmine lee - work-like Prototype

Here is her code
int button1 = 0;
int button2 = 0;
int button3 = 0;
int button4 = 0;

void setup(){
   pinMode(8,OUTPUT);
   pinMode(9,OUTPUT);
   pinMode(11,OUTPUT);
   pinMode(12,OUTPUT);
   pinMode(13,OUTPUT);
   Serial.begin(9600);
}

void loop(){
   button1 = digitalRead(2);
   button2 = digitalRead(3);
   button3 = digitalRead(4);
   button4 = digitalRead(5);
   Serial.println(button1);
   Serial.println(button2);
   Serial.println(button3);
   Serial.println(button4);
   if((button1 == HIGH)||(button2 == HIGH)||(button3 == HIGH)||(button4 == HIGH)){
       digitalWrite(13,HIGH);
   }else{
     digitalWrite(13,LOW);
   }
   if(button1 == HIGH){
       digitalWrite(8,HIGH);
   }
   if(button1 == LOW){
       digitalWrite(8,LOW);
   }
   if(button2 == HIGH){
       digitalWrite(9,HIGH);
   }
   if(button2 == LOW){
       digitalWrite(9,LOW);
   }
   if(button3 == HIGH){
       digitalWrite(11,HIGH);
   }
   if(button3 == LOW){
       digitalWrite(11,LOW);
   }
   if(button4 == HIGH){
       digitalWrite(12,HIGH);
   }
   if(button4 == LOW){
       digitalWrite(12,LOW);
   }
}
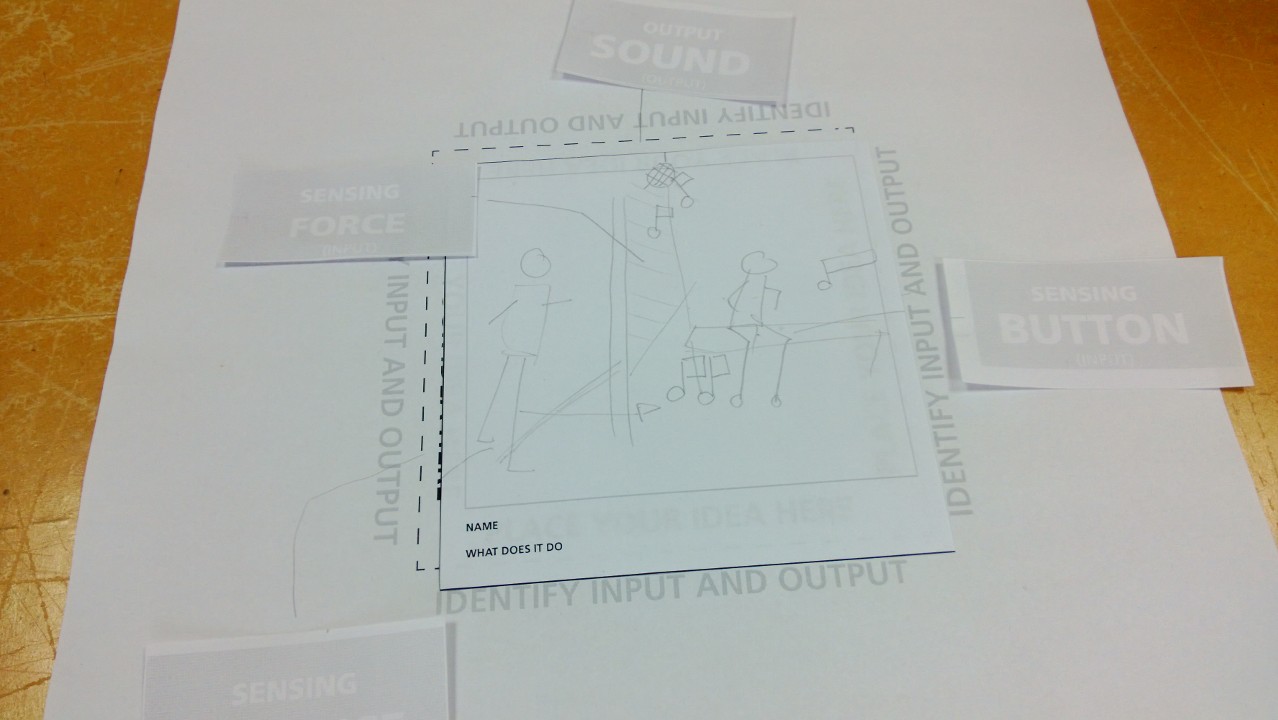
Defining and structuring tool v3
At last! Version 3 of the defining and structuring tool is finished!
(It will be test with some of the 3rd year tmr.) Let's see how that goes.
Here is some picture of it


Basically it is consisted of a concept sheet, Relation sheet, Relation cards, Condition cards and Output cards (You can see the title of each one in the slideshow, some version of it is not define. This means that if the users cannot find anything that match their needs then they can invent new ones. It is also a way for me to rapidly develop the toolkit as well.
Below are the picture of how it will look now. Once I try these out tomorrow, I should have an idea of how useful these actually are. Well, I hope for the best.


Instruction testing
Here are some image of the third version of what could be inside the prototyping pack
Basically this is a way to give the user of the pack and idea of how they can start thinking about interaction through some programming term like conditionally.
I intended to make this like a game where the user have to find the 'right' piece and then piece them together. This first version contained four parts which are the input cards, output cards, argument cards (<,>,=) and condition board.
The input cards contain generic input such as light intensity, sensing push, touch, force, temp, humidity and distance
The output cards contains output such as Light, Sound, Motor, Text, Email, Fan
Argument cards are < (less than), > (More than), = (equal to)
The conditional boards are basically boards that contain if then statement


Then I started to test out some idea of how these thing might play out and so I asked some people to write up some stupid, quick ideas and try to see whether they work or not. I still have to try them out with the 3rd year students and see how well this played out. (Sorry for the absurdity of the idea anyways)


The problem with them are the fact that they are a bit too long and I think there is no real connection between the input and the output cards (The connection between the If and the then is still missing). I think I have to made it in a way that that the user have to find the output to place under the input. I can even make the input card called the If card and then the output called the 'Then' card.
That again, might lead to some complication with some idea that might not required if & else statement (basically just output). I will tried to check these with some user anyways.
Summarizing Insight and Personas
So, I won't be showing all the insight that I have found yet since it is really too many of them and it would not be able to read properly. The personas here are actually made up of some of the quotes from the reading as well some from some interview that I got.
These characters will depict some of the user group that I have found. They are all inter-linked. I will also post my opportunities that are derived from them as well.
You can download the research + Insight here


interview oliver duke
Planning possible IFthisThen that version
Here is some image of the second version of the if and then statement from the defining and structure toolkit. It is a rough development on trying to achieve how the possible look and feel of it could be.


After that I drawn up possible options that a user can choose from and make it more define.